When it comes to installing crown molding, one of the most crucial aspects to consider is using the right size nails. Choosing the appropriate nail size ensures that your crown molding is securely attached to the wall, creating a sturdy and long-lasting installation. Incorrectly sized nails can lead to a variety of issues, such as the molding falling off the wall, unsightly gaps, or even damage to the molding itself.
In this comprehensive guide, we will explore the factors to consider when selecting nail sizes, recommend the best nail sizes for different types of crown molding materials, and provide tips for a successful installation.

Factors to Consider When Choosing Nail Size
Before diving into the specific nail sizes for crown molding, it’s essential to understand the factors that influence your choice. These factors include the type of crown molding material, the weight of the molding, and the wall material and structure.
Type of Crown Molding Material
Crown molding comes in various materials, each with its own characteristics and installation requirements. The most common materials are wood, medium-density fiberboard (MDF), and polystyrene.
Wood: Wood crown molding is a classic choice that offers a timeless and elegant look. It is available in a variety of wood species, such as pine, oak, and cherry. When installing wood crown molding, it’s crucial to use nails that can penetrate the wood without causing splitting or cracking.
MDF: MDF crown molding is an affordable and versatile option that mimics the appearance of wood. It is made from compressed wood fibers and resin, making it denser and more stable than natural wood. MDF molding requires nails that can securely hold the material without damaging its surface.
Polystyrene: Polystyrene crown molding is a lightweight and easy-to-install option. It is made from a type of foam and is often used in rooms with high humidity, such as bathrooms and kitchens. When installing polystyrene molding, it’s essential to use nails that are thin enough to prevent splitting or crumbling the material.
Weight of the Crown Molding
The weight of the crown molding is another crucial factor to consider when choosing nail sizes. Heavier moldings, such as those made from solid wood or thick MDF, require larger and stronger nails to ensure a secure hold. Lighter moldings, like polystyrene, can be installed using smaller and thinner nails.
Wall Material and Structure
The wall material and structure play a significant role in determining the appropriate nail size for crown molding installation. Most interior walls are made of drywall, which is a relatively soft material that requires special consideration when nailing. It’s essential to use nails that are long enough to penetrate the drywall and reach the wall studs behind it. Failure to hit the studs can result in the molding pulling away from the wall over time.
Recommended Nail Sizes for Crown Molding
Now that we’ve covered the factors to consider when choosing nail sizes, let’s explore the recommended sizes for different types of crown molding materials.

Wood Crown Molding
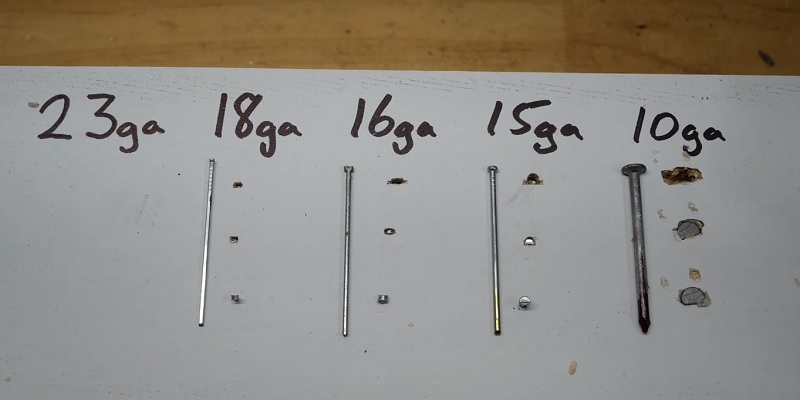
For wood crown molding, the best nail size to use is 2-inch finishing nails. Finishing nails, also known as finish nails, are available in 16-gauge or 15-gauge sizes. These nails are designed to minimize splitting and provide a clean, almost invisible hole that can be easily filled with wood putty.
The advantages of using finishing nails for wood crown molding include:
- Minimal splitting risk: The thin gauge of finishing nails reduces the likelihood of splitting the wood during installation.
- Clean appearance: Finishing nails create small holes that can be easily concealed with wood putty, resulting in a seamless and professional look.
- Strong hold: 2-inch finishing nails provide ample length to penetrate the wood molding and the drywall, reaching the wall studs for a secure hold.
MDF Crown Molding
Like wood crown molding, MDF molding is best installed using 2-inch finishing nails in 16-gauge or 15-gauge sizes. MDF is a dense material that requires nails with good holding power to prevent the molding from sagging or pulling away from the wall.
When installing MDF crown molding, keep these considerations in mind:
- Pilot holes: To minimize the risk of splitting or cracking the MDF, it’s a good idea to drill pilot holes before nailing. This is especially important when nailing near the edges of the molding.
- Proper nail placement: Ensure that the nails are driven straight and flush with the surface of the MDF. Overdriving the nails can cause the material to crack or break.
- Painting or priming: MDF crown molding should be painted or primed before installation to protect it from moisture and humidity.
Polystyrene Crown Molding
For polystyrene crown molding, the recommended nail size is 1-1/2-inch fine wire brads or pin nails. These nails are available in 18-gauge or 23-gauge sizes and are specifically designed for use with lightweight moldings.
The benefits of using smaller nails for polystyrene include:
- Reduced splitting risk: The thin gauge of fine wire brads and pin nails minimizes the risk of splitting or crumbling the polystyrene material.
- Easy installation: Polystyrene crown molding is lightweight and easy to handle, making it simple to install with smaller nails.
- Minimal hole size: The small diameter of fine wire brads and pin nails creates tiny holes that are barely noticeable, eliminating the need for extensive filling or touch-ups.
Nail Placement and Spacing
Proper nail placement and spacing are essential for achieving a secure and long-lasting crown molding installation. As a general rule, nails should be spaced every 16 inches along the length of the molding, coinciding with the standard spacing of wall studs.
Importance of Hitting Wall Studs
One of the most critical aspects of nail placement is ensuring that the nails penetrate the wall studs. Wall studs provide the necessary support and holding power for the crown molding. Nailing into drywall alone is not sufficient, as the nails can easily pull out over time, causing the molding to sag or fall off the wall.
To locate wall studs, use a stud finder tool. Start by placing the stud finder against the wall and slowly sliding it horizontally until it indicates the presence of a stud. Mark the stud location with a pencil, and repeat the process along the length of the wall where the crown molding will be installed.
Using Construction Adhesive in Conjunction with Nails
In addition to nailing, it’s highly recommended to use construction adhesive when installing crown molding. Construction adhesive provides an extra layer of security and helps fill any gaps between the molding and the wall.
To use construction adhesive, apply a continuous bead along the back of the crown molding before nailing it in place. The adhesive will bond the molding to the wall, creating a stronger and more stable installation. Be sure to use an adhesive that is compatible with the molding material and paintable for a seamless finish.
Tools Required for Installation
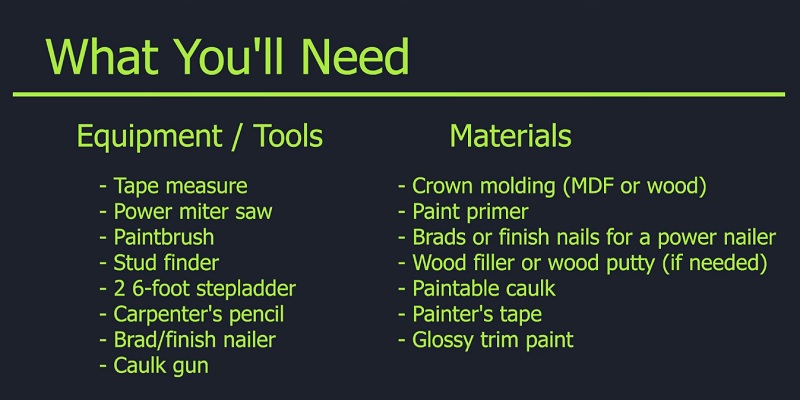
To ensure a successful crown molding installation, it’s essential to have the right tools on hand. The following tools are recommended:

Finishing Nailer or Brad Nailer
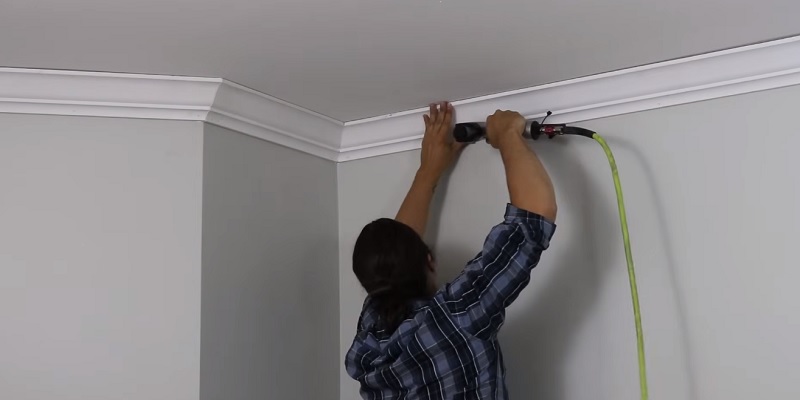
A finishing nailer or a pneumatic brad nailer that makes the installation process much faster and easier compared to manual nailing. These tools are designed to drive finishing nails or brad nails into the molding and wall with precision and consistency.
When choosing a finishing nailer or brad nailer, consider the following factors:
- Nail gauge compatibility: Ensure that the tool is compatible with the recommended nail gauge for your crown molding material.
- Adjustable depth control: Look for a nailer with adjustable depth control, allowing you to fine-tune the nail depth to prevent overdriving or underdriving.
- Comfort and ease of use: Choose a nailer that feels comfortable in your hand and is easy to operate, especially if you have a large installation project.
Hammer (for Manual Nailing)
If you prefer manual nailing or are working on a small project, a hammer is an essential tool. When using a hammer, be sure to select one with a smooth, rounded head to minimize the risk of damaging the crown molding.
Stud Finder
As mentioned earlier, a stud finder is crucial for locating wall studs and ensuring proper nail placement. Invest in a reliable stud finder that accurately detects the edges and center of studs, making your installation process more efficient.
Construction Adhesive
Construction adhesive is a must-have for a secure and long-lasting crown molding installation. Choose an adhesive that is suitable for your molding material and can be painted over for a seamless finish.
Tips for Successful Crown Molding Installation
In addition to using the right nail sizes and tools, there are several tips to keep in mind for a successful crown molding installation:
Properly Measuring and Cutting Crown Molding
Accurate measurements and cuts are essential for achieving a professional-looking crown molding installation. Before beginning, carefully measure the length of each wall and add a few extra inches to account for cutting errors or imperfections.
When cutting crown molding, use a miter saw with a fine-toothed blade designed for trim work. Make sure to adjust the saw blade angle according to the molding profile and the corner angle of the room. It’s a good idea to practice on scrap pieces of molding before making cuts on your actual material.
Coping Inside Corners for a Seamless Fit
Coping is a technique used to create a seamless fit at inside corners where two pieces of crown molding meet. Instead of relying on a simple miter cut, coping involves cutting the end of one molding piece to match the profile of the adjacent piece.
To cope crown molding:
- Cut a 45-degree miter on the end of the first molding piece that will fit into the corner.
- Use a coping saw to carefully follow the contoured edge of the mitered end, removing the excess material.
- Test the fit of the coped end against the adjacent molding piece, making any necessary adjustments.
- Apply construction adhesive and nail the coped end in place, ensuring a tight and seamless fit.
Filling Nail Holes and Finishing Touches
Once the crown molding is installed, it’s important to fill any nail holes and make finishing touches for a polished look. Use a high-quality wood filler or spackle that matches the color of your molding. Apply the filler with a putty knife, smooth it out, and allow it to dry completely before sanding it flush with the molding surface.
After filling the nail holes, you may need to touch up the paint or stain on the crown molding. Use a small brush or roller to apply the paint or stain, blending it seamlessly with the existing finish.
Common Mistakes to Avoid
To ensure a successful crown molding installation, be aware of these common mistakes and take steps to avoid them:
Using Nails That Are Too Short or Too Long
Using nails that are too short can result in poor holding power, causing the molding to come loose over time. On the other hand, nails that are too long can split the molding or penetrate too deeply into the wall, making it difficult to achieve a flush finish.
Always use the recommended nail sizes for your specific crown molding material, and adjust the depth setting on your nailer to ensure the nails are driven to the proper depth.
Nailing Into Drywall Without Hitting Studs
As discussed earlier, nailing crown molding into drywall alone is not sufficient for a secure installation. Make sure to locate and mark the wall studs using a stud finder, and place your nails accordingly. Failure to hit studs can result in the molding pulling away from the wall, sagging, or falling off entirely.
Overdriving or Underdriving Nails
Overdriving nails can cause the molding to split, crack, or become distorted, while underdriving nails can result in a weak hold and an uneven appearance. Pay close attention to the depth of your nails as you install the crown molding.
If using a pneumatic nailer, adjust the depth setting to ensure the nails are driven flush with the molding surface. When manually nailing, use a nail set to gently sink any protruding nails below the surface, preparing them for filling and finishing.
Final Thoughts
Installing crown molding can add a touch of elegance and sophistication to any room, but it’s crucial to use the right nail sizes for a secure and long-lasting installation. By considering factors such as the molding material, weight, and wall structure, you can select the appropriate nails for your project.
Remember to use 2-inch finishing nails for wood and MDF crown molding, and 1-1/2-inch fine wire brads or pin nails for polystyrene molding. Ensure proper nail placement by locating and nailing into wall studs, and use construction adhesive for added stability.
With the right tools, techniques, and attention to detail, you can achieve a professional-looking crown molding installation that enhances the beauty and value of your home. By following the guidelines and tips outlined in this article, you’ll be well on your way to a successful and impressive crown molding project.


