Ripping boards with a circular saw is a straightforward process. It requires precision and a few basic steps.
This guide will help you achieve clean cuts and smooth edges. Using a circular saw to rip boards can be a game-changer for your woodworking projects. It’s a powerful tool that offers versatility and ease in cutting long, narrow pieces of wood.
Whether you’re a beginner or an experienced DIY enthusiast, mastering this skill enhances your craftsmanship. With the right technique, you can tackle any project, from home renovations to creating furniture. In this post, we’ll explore the essential steps to use a circular saw effectively.
You’ll learn tips for setting up your workspace, ensuring safety, and achieving those perfect cuts. Get ready to dive into the world of woodworking and discover how to rip boards like a pro!
Choosing The Right Circular Saw
Choosing the right circular saw for board ripping is crucial. It affects the quality and ease of your work. With various models available, finding the best fit can be challenging. This guide simplifies the selection process.
Types Of Circular Saws
Circular saws come in different types. Each serves unique purposes. The most common is the sidewinder. It’s lightweight and ideal for most tasks. The worm drive saw offers more torque. Perfect for tougher materials. A compact saw suits small spaces. It’s easy to handle and store. Consider your specific needs.
Key Features To Consider
Blade size matters. Larger blades cut deeper. Motor power is essential. More power means smoother cuts. Look for a saw with adjustable settings. This adds versatility. Safety features are vital. A reliable blade guard prevents accidents. Comfortable handles reduce fatigue. Make sure they fit your grip well.
Selecting The Appropriate Blade
Choosing the right blade for your circular saw is crucial. It can affect the cut quality and safety. A well-selected blade ensures smooth and precise board ripping. Understanding different blade options can save time and improve results.
Blade Material Options
Blades come in various materials. Each has its unique benefits. Carbide-tipped blades are popular for durability. They stay sharp longer and are ideal for tough materials. Steel blades are cheaper but dull quickly. They are suitable for softer woods. Diamond blades excel in cutting hard surfaces. But they are expensive. Knowing your material needs helps select the right blade.
Choosing The Right Blade Size
Blade size impacts cutting depth and speed. Smaller blades offer precision. They’re great for detailed work. Larger blades cut faster and deeper. Ideal for thick boards. Match the blade size to your project needs. Ensure the blade fits your saw’s specifications. Wrong size can cause safety risks. Always check your saw’s manual for size compatibility.
Preparing The Work Area
Preparing your work area is the first crucial step in successfully ripping boards with a circular saw. A well-organized space not only ensures safety but also enhances efficiency. Before you start slicing through timber, take a moment to arrange your surroundings thoughtfully.
Ensuring Safety Measures
Safety should always be your top priority. Begin by wearing protective gear: safety goggles to shield your eyes from flying debris and ear protection to guard against the loud noise.
Clear the area of any clutter or obstacles. A clean space reduces the risk of accidents and provides room to maneuver your saw comfortably.
Consider the lighting too. Adequate illumination helps you see the cut line clearly, preventing mistakes that could lead to injuries.
Organizing Tools And Materials
Having your tools within arm’s reach saves you time and keeps your workflow smooth. Lay out your circular saw, measuring tape, straight edge, and clamps on a sturdy table or workbench.
Set aside the boards you’ll be cutting in a neat pile. This prevents you from searching for materials mid-task, keeping your focus on the job.
Think about the surfaces you’re working on. Use sawhorses or a stable platform to support the boards, ensuring they’re at a comfortable height for cutting.
Have you ever wasted time hunting for a misplaced screwdriver or other tool? Organizing beforehand helps avoid these common frustrations, letting you concentrate on precision and quality.
By meticulously preparing your work area, you set the stage for a successful and stress-free woodworking project. What’s your strategy for maintaining an efficient workspace?
Measuring And Marking Boards
Measuring and marking boards is the crucial first step in ripping boards with a circular saw. It sets the foundation for precision and accuracy, ensuring you achieve the desired outcome without any hiccups. Whether you’re a seasoned DIY enthusiast or a beginner looking to hone your skills, mastering this step can make or break your project. Imagine the satisfaction of seeing perfectly ripped boards; it all starts here.
Using A Tape Measure
A tape measure is your best friend when it comes to measuring boards. It’s simple yet powerful in ensuring accuracy. Always start by measuring the length and width of the board you need to rip. Measure twice, cut once—it’s a rule that saves you from costly mistakes.
Hold the tape measure firmly against the edge of the board for a precise measurement. Avoid bending or stretching the tape, as this can lead to errors. Remember to check the measurements twice before marking them down. Double-checking might seem tedious, but it guarantees precision.
Marking Straight Lines
Once you’ve measured, marking straight lines is your next step. Use a pencil or chalk for clear visibility, depending on the board material. Start by marking the measurements on both ends of the board. Connect these marks using a straight edge or ruler.
Ensure that your straight edge is aligned perfectly with the marks. Any deviation can result in crooked cuts, wasting materials and time. Consider using a carpenter’s square for better accuracy. It’s a simple tool that offers remarkable precision.
Have you ever marked a board only to realize the line was slightly off? It happens, but you can avoid it. Take a moment to inspect your lines before proceeding with the cut. This small step can prevent errors and ensure your project runs smoothly.
Mastering the art of measuring and marking boards is vital to achieving precision cuts. It may seem basic, but these steps are foundational to your success. How often do you find yourself rechecking measurements? Embrace this habit for flawless results every time.
Setting Up The Circular Saw
Start by adjusting the blade depth for accurate cuts. Secure the board firmly to prevent movement. Use a straight edge or guide to maintain a clean, straight line while ripping. Ensure safety by wearing protective gear and keeping hands clear of the blade’s path.
Setting up your circular saw properly is crucial for ripping boards accurately and safely. Whether you’re a seasoned DIY enthusiast or a woodworking novice, getting this setup right can make all the difference. A well-prepared circular saw not only ensures smooth cuts but also enhances your confidence and skill in handling woodworking projects.
Adjusting The Blade Depth
Blade depth is a key factor in achieving a clean cut. Set the blade so it extends no more than a quarter inch below the board. This minimizes resistance and reduces the risk of kickback.
Take a moment to check the blade’s sharpness. A sharp blade not only cuts cleaner but also makes the process easier on both you and the saw. Regular maintenance can save you time and ensure precision in your projects.
Aligning The Guide And Fence
Alignment is where precision meets practice. Position the guide parallel to the cut line for a straight rip. Ensure the fence is snug against the board to prevent drifting.
Use a measuring tape to double-check the distance from the blade to the guide. Consistent measurements across the length of the board can prevent uneven cuts. Is your setup ready for a test run? A quick check can reveal any last-minute adjustments needed.
Setting up your circular saw with attention to detail can transform your woodworking experience. What other tips have you found essential when preparing your tools for a project? Share your insights in the comments!
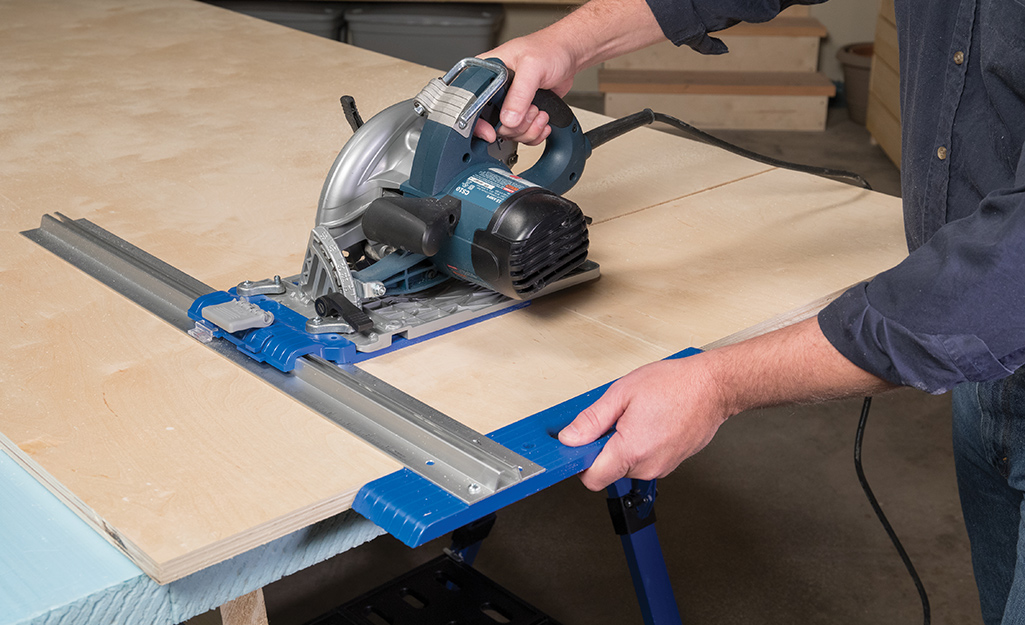
Credit: www.homedepot.com
Executing The Rip Cut
Executing the rip cut with a circular saw can transform a daunting task into an efficient process. It’s all about precision and control, ensuring your boards are cut smoothly and accurately. Let’s delve into the essential practices that will help you master the art of rip cutting.
Maintaining A Steady Pace
Consistency is key when executing a rip cut. A steady pace ensures the saw doesn’t bind or stall. Imagine you’re driving; you wouldn’t abruptly accelerate and brake. Similarly, a smooth, even motion with the saw will yield the best results.
Consider starting with a practice board. This helps you get a feel for the saw’s speed and your own rhythm. Trust your instincts as you push the saw forward, letting the blade do the work.
Have you ever rushed a cut, only to realize the edges weren’t as clean as you’d hoped? Take your time. The goal is not speed, but precision and quality.
Ensuring Straight Cuts
To achieve straight cuts, your setup is crucial. A rip guide can be your best friend here. It acts as a ruler, guiding the saw in a straight line. Without a guide, even the steadiest hand can waver.
Before cutting, measure twice. Mark your board clearly with a pencil, ensuring the line is visible as you cut. This small step saves time and frustration later.
Have you considered using a clamp to secure your board? This keeps it from moving, allowing you to focus entirely on guiding the saw. A stable board equals a straight cut.
Ultimately, executing a rip cut with a circular saw is about practice and patience. Are you ready to see the results of careful planning and execution? Grab your saw and make those cuts count.
Troubleshooting Common Issues
Cutting boards with a circular saw can be tricky. Ensure the blade is sharp and aligned correctly. Secure the board firmly to prevent shifting during the cut.
Ripping boards with a circular saw can present various challenges. Understanding common issues helps in achieving smooth cuts and better results. This section covers troubleshooting methods for common problems encountered during board ripping.
Dealing With Kickback
Kickback occurs when the saw blade grabs the wood suddenly. This can be dangerous. To minimize kickback, ensure your blade is sharp and clean. A dull blade increases the risk of kickback. Adjust the blade depth properly; it should barely protrude through the board. Use a firm grip on the saw and maintain steady pressure. Keep the saw aligned with the cut line. Avoid forcing the saw through the wood. Consistent speed reduces kickback chances.
Fixing Jagged Edges
Jagged edges can ruin your project. A common cause is a dull blade. Regularly check your blade’s condition. Sharpen or replace it as needed. Use a guide or fence for straight cuts. This keeps the saw steady and accurate. Slow and consistent cutting speed prevents jagged edges. Ensure the saw blade is suited for the wood type. Different woods require specific blades. Test on scrap wood first. Adjust your technique based on results.
Finishing And Cleaning Up
Clear the work area of sawdust and debris to ensure safety. Check the cut for any rough edges and sand them smooth. Return tools to their proper place and dispose of waste materials responsibly. This keeps your workspace tidy and ready for the next project.
After you’ve successfully ripped your boards with a circular saw, it’s time to focus on the finishing and cleaning up process. This step ensures that your project looks professional and stands the test of time. Paying attention to these details can make a significant difference in the final outcome of your woodworking project.
Smoothing The Cut Edges
Once your board is cut, you’ll likely notice that the edges are a bit rough. To smooth them out, use sandpaper or a sanding block. Start with a coarse grit to remove larger splinters, then move to a finer grit for a polished finish.
Have you ever run your hand over a freshly cut edge only to feel splinters? A smooth edge not only looks better but is safer to handle. Sanding also prepares the wood for any finish or paint you might want to apply.
Proper Tool Maintenance
Maintaining your circular saw is crucial for future projects. After you finish cutting, clean the sawdust off your tool. This keeps the saw in good condition and ensures it performs well next time.
Check the blade for any signs of wear or damage. A dull blade can ruin your work and make cutting more dangerous. Regularly inspecting and replacing blades when necessary can save you from headaches down the road.
Keeping your workspace clean is just as important. A clutter-free area not only boosts efficiency but also reduces the risk of accidents. Take a moment to sweep up and organize your tools, leaving you ready for the next task.
What steps do you find most effective in keeping your tools in top shape? Share your insights in the comments below and let’s learn from each other’s experiences.

Credit: www.youtube.com
Frequently Asked Questions
Can You Rip Wood With A Circular Saw?
Yes, you can rip wood with a circular saw. Use a straight edge guide for accurate cuts. Ensure the blade is sharp and appropriate for the wood type. Set the depth slightly deeper than the wood thickness. Always follow safety precautions and wear protective gear while operating the saw.
How To Rip 4×8 Plywood With Circular Saw?
To rip 4×8 plywood with a circular saw, secure the sheet on sawhorses or a stable surface. Mark your cutting line using a straight edge. Set the saw blade depth slightly deeper than the plywood thickness. Guide the saw steadily along the line, maintaining consistent speed and pressure.
How To Rip Long Boards By Yourself?
Use a table saw with a fence guide for precision. Secure the board firmly and wear safety gear. Use push sticks to maintain control. Keep hands away from the blade and follow the board through the cut. Ensure proper lighting and workspace for safe operation.
What Tool Is Best For Ripping A 2×4?
A table saw is best for ripping a 2×4. It offers precision and efficiency. Use a sharp, high-quality blade. Ensure safety by using push sticks and wearing safety gear. A circular saw can also work for smaller jobs. Always measure and mark cuts accurately before starting.
Final Thoughts
Ripping boards with a circular saw is simple with practice. Start with safety first. Wear protective gear. Use the right blade for clean cuts. Measure twice, cut once. Keep a steady hand and firm grip. Ensure the saw is in good condition.
Follow these steps to achieve great results. With patience, skills improve over time. Soon, you’ll handle projects like a pro. Remember, practice makes perfect. Consistent effort leads to smoother cuts. Enjoy the process and progress. Happy woodworking!