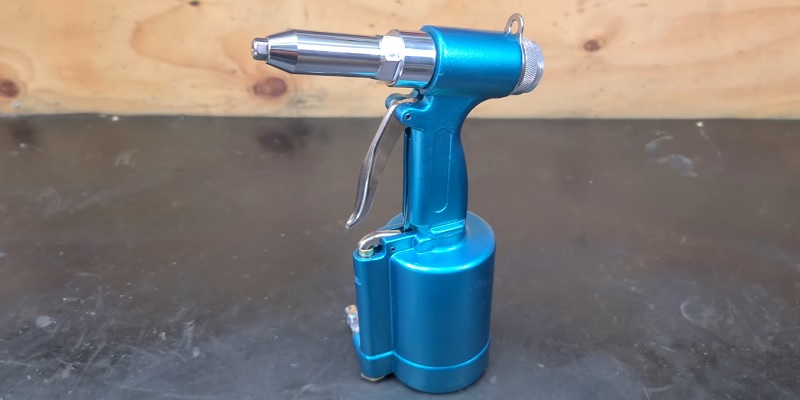
A pneumatic rivet gun is a tool that uses compressed air to join materials together with rivets. These guns are handy in many industries, making work faster and easier. They’re great for tasks that need lots of rivets, saving time and effort compared to manual riveting.
Before using or buying one, you must understand how a pneumatic rivet gun works. This article is based on briefing all about this, so let’s get started!

Why Pneumatic Rivet Guns Matter
These tools are key in many fields:
- Car making
- Airplane building
- Construction
- Manufacturing
They help make strong, long-lasting joins quickly. This speed and strength are why many businesses rely on pneumatic rivet guns for their work.
The Parts of a Pneumatic Rivet Gun
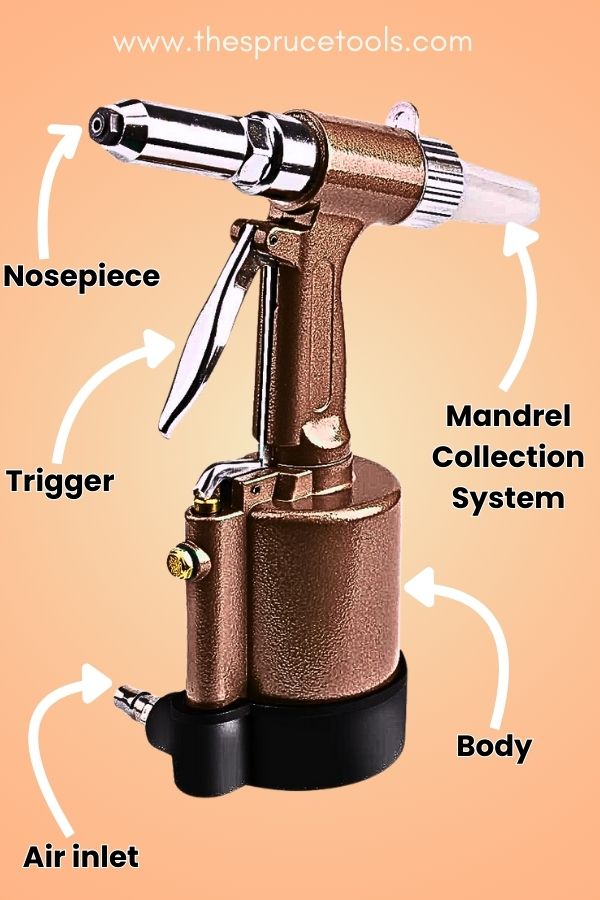
To understand how these guns work, let’s look at their main parts:

Air Inlet
The air inlet is where compressed air enters the gun. It’s usually found at the bottom of the handle. Most air inlets have a quick-connect fitting for easy attachment to the air hose.
Trigger
The trigger controls the flow of air into the gun. When pulled, it allows compressed air to flow through the gun. Some models have adjustable triggers for better control over the riveting process.
Rivet Gun Body
The rivet gun body is the main part you hold, housing the internal workings. It’s typically made of durable materials like aluminum or steel and is designed for comfortable handling during use.
Hydraulic System (in hydro-pneumatic models)
In hydro-pneumatic models, the hydraulic system converts air pressure into hydraulic force. It consists of a piston and cylinder filled with hydraulic fluid. This system amplifies the force applied to the rivet, making it easier to set larger or tougher rivets.
Nosepiece
The nosepiece holds the rivet in place during installation and guides it into the pre-drilled hole. Different sizes are available for various rivet types, and they’re usually interchangeable for versatility.
Jaw System
Located inside the nosepiece, the jaw system grips the mandrel (stem) of the rivet. It pulls the mandrel to set the rivet, which is a crucial part of the riveting process.
Mandrel Collection System
The mandrel collection system catches the broken-off mandrels after riveting. It can be a simple collection bottle or a more advanced vacuum system. This component helps keep the work area clean and safe.
Exhaust Port
The exhaust port releases used air from the gun. It’s often located at the rear or bottom of the gun. Some models have adjustable exhaust ports to direct air away from the user, improving comfort during operation.
Air Pressure Regulator (on some models)
Some pneumatic rivet guns include an air pressure regulator. This allows you to adjust the air pressure, helping control the force applied to rivets. It’s particularly useful when working with different materials or rivet sizes.
Stroke Adjustment Mechanism (on some models)
Certain models feature a stroke adjustment mechanism. This lets you change the pulling stroke length, helping adapt the gun for different rivet lengths and materials.
Safety Mechanism
The safety mechanism prevents accidental triggering of the gun. It’s often integrated with the trigger system and is an important feature for user safety.
Handle
The handle is designed for a comfortable grip. It may have a rubber or ergonomic coating for better handling, reducing user fatigue during extended use.
Air Hose (external component)
While not part of the gun itself, the air hose is a crucial external component. It connects the gun to the air compressor, delivering the necessary air pressure. Air hoses are flexible and durable to allow easy movement and are available in different lengths and diameters to suit various working conditions.
Understanding these parts helps you use and maintain your pneumatic rivet gun effectively. Each component plays a crucial role in the riveting process, from delivering air power to setting the rivet securely. Knowing how these parts work together can improve your riveting skills and help you troubleshoot any issues that may arise.
How Pneumatic Rivet Guns Work
These guns turn compressed air into force for riveting. Here’s how:
- The air compressor squeezes air, storing it under high pressure.
- This air travels through the hose to the gun.
- When you pull the trigger, the compressed air rushes into the gun’s cylinder.
- The fast-moving air pushes a piston, which hits the rivet.
- This force reshapes the rivet, joining the materials together.
The Step-by-Step Riveting Process
Let’s break down how you use a pneumatic rivet gun:
1. Connecting to an Air Compressor
Before you start riveting, you need to set up your air supply. Connect the pneumatic rivet gun to an air compressor using an air hose. Make sure the connection is tight and secure to prevent air leaks, which could reduce the tool’s power and effectiveness. Set the air compressor to the correct pressure, typically between 70 and 100 PSI, depending on your gun’s specifications and the size of the rivets you’re using. Always check your gun’s manual for the recommended air pressure.
2. Loading the Rivet

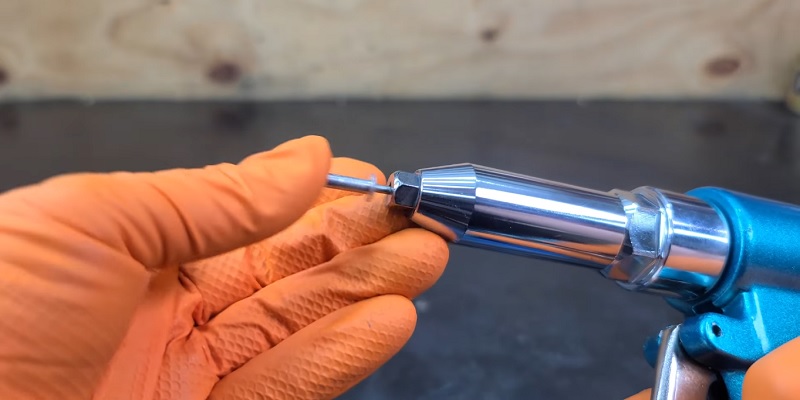
Once your gun is connected and pressurized, it’s time to load a rivet. Pick up a rivet and insert it into the gun’s nosepiece.
Rivets have two main parts: the body (the part that will expand) and the mandrel (the metal pin in the middle that the gun pulls on). Make sure the rivet is fully seated in the nosepiece, with the mandrel facing into the gun.
Read Also: Types of pop rivets
3. Positioning the Gun
Next, line up the loaded gun with the pre-drilled hole in your materials. The rivet should fit snugly in the hole. If it’s too loose, you might need a larger rivet. If it’s too tight, check that your hole is the correct size for the rivet. Hold the gun perpendicular to the surface for the best results. This ensures the rivet sets evenly and creates a strong join.
4. Pulling the Trigger
With everything in place, it’s time to set the rivet. Squeeze the trigger firmly. This action releases compressed air into the gun, starting the riveting process. Keep the gun steady and maintain pressure on the trigger until the rivet is fully set. You’ll usually hear a distinct sound when the rivet is fully installed.
5. Rivet Deformation and Fastening
As you hold the trigger, the compressed air drives a piston inside the gun. This piston pushes on the rivet’s mandrel, pulling it back into the gun. As the mandrel moves, it forces the rivet body to deform. The rivet becomes shorter and wider, creating a “bubble” on the blind side of the material. This expanding rivet body grips the materials tightly, joining them together.
6. Mandrel Ejection
Once the rivet is fully set, the gun applies enough force to break off the mandrel at its predetermined breaking point. In most pneumatic rivet guns, the used mandrel is automatically ejected, usually falling out of the back of the gun. Some models have a collection system to catch these used mandrels for easy cleanup.
7. Inspection and Repeat
After setting the rivet, quickly inspect it to ensure it’s properly installed. The rivet head should be flush against the material, and there should be no gaps. If everything looks good, you’re ready to move on to the next rivet. Repeat the process from step 2 for each rivet needed in your project.
Read About: How to remove Rivets?
Remember, practice makes perfect when it comes to using a pneumatic rivet gun. As you become more familiar with your tool, you’ll develop a feel for the right amount of pressure and timing needed for perfect rivets every time.
Types of Pneumatic Rivet Guns
There are a few kinds of pneumatic rivet guns:
Standard Pneumatic Rivet Guns
These are the most common. They use direct air pressure to set rivets. They’re good for many everyday tasks.
Hydro-pneumatic Rivet Guns
These guns use both air and hydraulic fluid. The air pressure works with the fluid to create more force. This makes them better for tougher jobs or bigger rivets.
Check Here: Best Cordless Rivet Gun
Comparing the Types
- Standard guns are lighter and easier to use for long periods.
- Hydro-pneumatic guns can handle harder materials and larger rivets.
- Standard guns are often cheaper and need less upkeep.
- Hydro-pneumatic guns give more consistent results with less effort.
Benefits of Using Pneumatic Rivet Guns
These tools offer many advantages:
Speed and Efficiency
Pneumatic rivet guns work much faster than manual riveting. This saves time, especially on big projects.
Consistent Results
These guns apply the same force each time. This means every rivet is set the same way, giving reliable joins.
Less Tiring for Workers
The gun does most of the work. This means less strain on the person using it, reducing fatigue and the risk of repetitive strain injuries.
Versatile Use
Pneumatic rivet guns can work with many types of rivets and materials. They’re useful for thin sheets or thicker pieces.
Where Pneumatic Rivet Guns Are Used
These tools are used in many industries:
Automotive Industry
Car makers use these guns to join body panels, attach trim, and assemble parts.
Aerospace
Airplane builders rely on pneumatic rivet guns for attaching skin panels to the plane’s frame.
Construction
In building, these guns help with metal roofing, siding, and structural joins.
Manufacturing
Many factories use pneumatic rivet guns to assemble products, from appliances to electronics.
Keeping Your Pneumatic Rivet Gun in Good Shape
To keep your gun working well:
Regular Cleaning
Clean your gun after each use. Remove any dirt or metal bits that might clog it.
Oiling
Put a few drops of air tool oil in the gun’s air inlet regularly. This keeps the moving parts working smoothly.
Proper Storage
Store your gun in a dry place. This prevents rust and damage to the internal parts.
Safety Gear
Always wear safety glasses when using the gun. Ear protection is also a good idea, as these tools can be noisy.
Safe Use
- Keep your fingers away from the nosepiece when the gun is connected to air.
- Don’t point the gun at anyone, even if it’s not in use.
- Disconnect the air supply when you’re not using the gun.
Fixing Common Problems
Sometimes things go wrong. Here’s how to fix common issues:
Low Air Pressure
If your gun seems weak:
- Check your air compressor settings.
- Look for leaks in the air hose.
- Make sure the gun’s air inlet isn’t blocked.
Jammed Rivets
If a rivet gets stuck:
- Turn off the air supply.
- Carefully remove the jammed rivet with pliers.
- Check the nosepiece for damage.
Worn Out Parts
Over time, parts can wear out:
- Replace the nosepiece if it’s damaged or worn.
- Check the piston and replace it if needed.
- Keep an eye on O-rings and seals, replacing them when they wear out.
How Pneumatic Riveting Compares to Other Methods
Let’s see how pneumatic riveting stacks up against other ways of setting rivets:
Manual Riveting
- Pneumatic is much faster.
- Pneumatic gives more consistent results.
- Manual is cheaper to start with but slower for big jobs.
Electric Rivet Guns
- Pneumatic guns are often more powerful.
- Electric guns don’t need an air compressor.
- Pneumatic guns can usually handle a wider range of rivet sizes.
Hydraulic Rivet Guns
- Hydraulic guns can produce more force for very large rivets.
- Pneumatic guns are usually lighter and easier to handle.
- Pneumatic guns are often cheaper and simpler to maintain.
Picking the Right Pneumatic Rivet Gun
Choosing the best pneumatic rivet gun for your needs is key. Here’s what to think about:
Power
The gun’s power affects what it can do. Check the gun’s pulling force, measured in pounds or newtons. For small rivets (1/8 inch), a gun with 1,500 lbs of force works well. Medium rivets (3/16 inch) need about 2,500 lbs of force. Large rivets (1/4 inch) require 4,000 lbs of force or more. Pick a gun that matches the rivet sizes you use most often.
Size and Weight
The gun’s size and weight matter for comfort. Lighter guns (1-2 lbs) are good for long jobs or overhead work. Heavier guns (3-4 lbs) might be stronger but can tire you out faster. Think about where you’ll use the gun. Tight spaces need smaller tools.
Ergonomics
A comfortable gun helps you work better. Hold the gun before buying if you can. It should feel good in your hand. Look for guns with padded grips to reduce vibration. Some guns have adjustable handles. These can fit different hand sizes.
Air Consumption
Your gun needs to work with your air compressor. Check the gun’s air consumption rate, usually in cubic feet per minute (CFM). Most rivet guns use 3-4 CFM at 90 PSI. Make sure your compressor can supply more air than the gun needs. A bigger compressor tank helps if you’re using the gun a lot.
Stroke Length
Stroke length affects how the gun works. Longer stroke (about 1 inch) is good for softer materials and longer rivets. Shorter stroke (about 5/8 inch) works well for harder materials and shorter rivets. Some guns let you adjust the stroke length.
Extra Features
Look for helpful extras. Quick-change nosepieces make it easy to switch rivet sizes. Built-in vacuum systems can catch spent mandrels. Some guns have gauges to show if rivets are set right.
Popular Brands and Models
Here are some well-known brands and their popular models:
Astro Pneumatic Tool has two notable models: the PR36 Air Riveter, which is lightweight and good for DIY use, and the PR14 Heavy Duty Air Riveter, which is stronger and suited for professional use.
Chicago Pneumatic’s CP9882 Pneumatic Riveter is known for its durability.
Campbell Hausfeld produces the TL053900 Air Riveter, which has a long nose for hard-to-reach spots.
Remember, the best gun for you depends on your specific needs. Think about what kind of work you do most often when choosing.
See More: Best Rivet gun
What’s Next for Pneumatic Riveting?
The world of pneumatic riveting is changing:
More Automation
We’re seeing more automated riveting systems. These can place many rivets quickly without human help.
Smarter Tools
New rivet guns might have sensors to check each rivet. This could help catch problems early.
Better Materials
New types of rivets and stronger, lighter materials might change how we use these tools.
Wrapping Up
Pneumatic rivet guns are important tools in many industries. They make joining materials faster, easier, and more reliable. By using air pressure, these guns can set rivets quickly and consistently.
Understanding how these tools work helps you use them better. Whether you’re in manufacturing, construction, or DIY projects, knowing about pneumatic rivet guns can be very useful.
As technology moves forward, we can expect these tools to get even better. They’ll likely become smarter and more efficient, helping industries work faster and better.
Common Questions
What size air compressor do I need for a pneumatic rivet gun?
Most pneumatic rivet guns need an air compressor that can deliver at least 90 PSI. A compressor with a 6-gallon tank is usually enough for most jobs.
Can pneumatic rivet guns be used for all types of rivets?
Most pneumatic rivet guns can handle a wide range of rivets. However, very large rivets might need a special gun. Always check your gun’s specs to see what size rivets it can use.
How long does a pneumatic rivet gun typically last?
With good care, a quality pneumatic rivet gun can last many years. Regular cleaning and oiling help a lot. How long it lasts also depends on how much you use it and what kind of work you do.
Are pneumatic rivet guns loud?
Yes, pneumatic rivet guns can be noisy. The sound comes from the compressed air and the impact of setting the rivet. It’s a good idea to wear ear protection when using these tools.
Can pneumatic rivet guns be used for DIY projects?
Absolutely! While they’re common in industry, pneumatic rivet guns are great for DIY projects too. They’re especially useful for jobs like metal roofing, automotive work, or building metal structures at home.


