Framing is the backbone of any construction project, whether you’re building a new home, adding an extension, or constructing a shed. Choosing the right nail size for framing is crucial to ensure the structural integrity and longevity of your build. The wrong nails can lead to weak joints, structural instability, and even safety hazards.
In this guide, we’ll explore the essential considerations for selecting the appropriate nail sizes for framing various types of projects. Whether you’re working with 2×4 or 2×6 lumber, tackling interior or exterior walls, or simply looking for a comprehensive framing nail size chart, we’ve got you covered. By understanding the nuances of nail sizes and gauges, you can make informed decisions that will enhance the quality and durability of your construction work.
Let’s dive into the details and ensure your framing projects are built to last, starting with the basics of nail sizes and gauges.
Understanding Nail Sizes and Gauges
When it comes to framing, not all nails are created equal. Two critical dimensions define nails: size (length) and gauge (thickness). Understanding these measurements is essential for selecting the right nails for your framing projects.
Nail Sizes (Length)
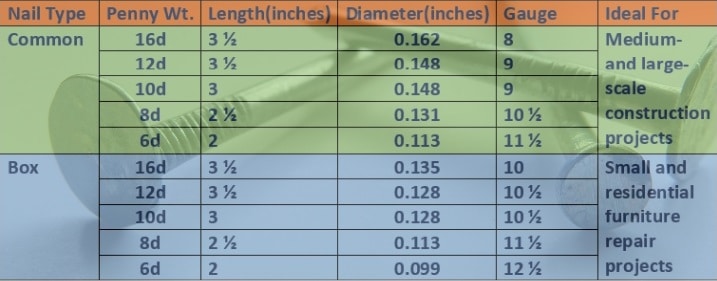
Nail sizes are typically expressed using the “penny” system, denoted by a “d” after the number. The penny system originated in medieval England, where nails were sold by the hundred (a “hundred” being 120 nails). Common framing nail sizes include:
- 6d (2 inches)
- 8d (2.5 inches)
- 10d (3 inches)
- 12d (3.25 inches)
- 16d (3.5 inches)
As the penny size increases, so does the length of the nail. Choosing the right nail size is crucial for achieving proper holding strength and avoiding issues like splitting the wood or having insufficient penetration.
Nail Gauges (Thickness)
Gauge refers to the thickness of the nail shank. Contrary to intuition, the higher the gauge number, the thinner the nail. Common gauges for framing nails include:
- 10 gauge (thickest)
- 12 gauge
- 14-15 gauge
- 16 gauge (thinnest)
Thicker gauges provide more strength and holding power, while thinner gauges are less likely to split wood and are easier to drive. Selecting the appropriate gauge depends on the specific application and the type of lumber being used.
Framing Nail Size Chart

To make it easier for you to select the appropriate nail size for your framing project, refer to this handy chart:
| Nail Size | Length | Gauge | Typical Uses |
| 6d | 2″ | 11-12 | Sheathing, light framing |
| 8d | 2.5″ | 12-13 | Light framing, attaching sheathing, small lumber pieces |
| 10d | 3″ | 12 | General framing, 2×4 studs, interior walls, joists |
| 12d | 3.25″ | 11-12 | Medium-duty framing, floor joists, thicker lumber |
| 16d | 3.5″ | 10-11 | Heavy-duty framing, 2×6 studs, exterior walls, load-bearing walls |
Types of Framing Nails
Several types of nails are commonly used in framing, each designed for specific purposes and conditions:
Common Nails: These are the most frequently used framing nails, featuring a thick shank and a large, flat head. They offer excellent holding power and are ideal for heavy-duty framing tasks.
Box Nails: Similar to common nails but with a thinner shank, box nails are used in lighter framing applications where splitting is a concern. They provide less holding power but minimize the risk of wood splitting.
Sinker Nails: Coated with vinyl or epoxy, sinker nails drive into the wood more easily and offer increased holding power. The coating also helps prevent rust in humid environments.
Duplex Nails: Also known as double-headed nails, duplex nails have two heads – one that drives into the wood and another that remains above the surface. These nails are ideal for temporary structures, as they can be easily removed when needed.
Factors to Consider When Selecting Nails for Framing
Choosing the right nail size and gauge for your framing project involves considering several key factors:
Lumber Dimensions
The thickness of the lumber being used is a primary determinant of the nail size needed. A general rule of thumb is to select a nail that is at least three times the length of the thinner material’s thickness to ensure adequate penetration and holding strength.
For example:
- 2×4 lumber (1.5 inches thick): 10d nails (3 inches) are suitable
- 2×6 lumber (1.5 inches thick): 16d nails (3.5 inches) provide extra holding power
Type of Wood
The density and hardness of the wood being used also influence nail selection:
- Softwoods (e.g., pine, fir): These woods are commonly used in framing and require nails with good holding power but a lower risk of splitting. Box nails or sinker nails are often suitable for softwoods.
- Hardwoods (e.g., oak, maple): Denser and more prone to splitting, hardwoods often require thicker gauge nails and pre-drilling to prevent cracking. Common nails or specialized hardwood nails are recommended.
Load-Bearing Requirements
The intended use of the framed structure determines the necessary nail strength:
- Non-Load-Bearing: For structures that won’t bear significant weight, such as interior partition walls, 8d or 10d nails are usually sufficient.
- Load-Bearing: Walls, floors, and roofs that will support substantial loads require stronger nails, such as 12d or 16d, to ensure structural integrity and safety.
Environmental Conditions
The environment in which the framing will be exposed plays a role in nail selection:
- Indoor: For framing projects that will remain inside a controlled environment, standard nail types and finishes are generally adequate.
- Outdoor: Framing exposed to the elements requires nails with corrosion-resistant coatings, such as galvanized or stainless steel, to prevent rusting and deterioration over time.
Practical Tips for Successful Framing with Nails
In addition to selecting the right nail size and gauge, consider these practical tips to achieve the best results in your framing projects:
Pre-Drilling
When working with hardwoods or dense softwoods, pre-drilling pilot holes slightly smaller than the nail diameter can help prevent splitting, especially when nailing near the ends or edges of boards.
Nail Gun Settings
If using a pneumatic nail gun, adjust the depth setting to ensure that the nail heads are driven just below the wood surface without over-penetrating, which can weaken the connection. Experiment on scrap wood to find the optimal setting.
Choose From Here: Best Cordless Framing Nailers
Nailing Techniques
Employ proper nailing techniques to maximize the strength of your framing connections:
- Toenailing: Drive nails at an angle through one board and into another to create a stronger joint compared to nailing perpendicular to the surface.
- Staggering: When nailing multiple nails in a row, slightly offset each nail from the one before it to avoid creating a straight line of stress in the wood.
Real-World Framing Scenarios and Nail Recommendations
To help you apply your knowledge of nail sizes and gauges, let’s explore some common framing scenarios and the recommended nail choices for each:
Building a Deck
When constructing a deck using pressure-treated lumber, 16d galvanized or stainless steel nails are the go-to choice for framing the main structure. These nails provide the necessary holding power and corrosion resistance to withstand outdoor exposure. For attaching decking boards, shorter nails like 8d or 10d are typically used to avoid piercing through the boards.
Framing Interior Walls
For non-load-bearing interior walls, 10d nails are a versatile choice when working with standard 2×4 lumber. These nails offer a balance of holding strength and ease of driving. If using thinner lumber or if splitting is a concern, box nails or sinker nails can be used instead. When framing load-bearing interior walls, consider stepping up to 12d or 16d nails for added strength.
Constructing a Roof
Framing a roof involves creating trusses or rafters and attaching sheathing. For joining truss members or connecting rafters to top plates, 16d common nails provide the necessary strength to handle the roof load. When attaching sheathing to the roof structure, 8d or 10d nails are typically sufficient, as the sheathing itself does not bear the primary load.
Framing a Shed or Garage
When building a shed or framing a garage, the nail size and type will depend on the specific design and lumber used. Generally, 16d common nails are a reliable choice for framing walls and joining plates to studs. If using thicker lumber like 2x6s for walls or roof framing, 16d nails become even more crucial for providing adequate holding power.
Attaching Sheathing or Light Framing
For attaching sheathing or other light framing tasks, 6d nails can be a suitable choice. These shorter nails provide enough holding power while minimizing the risk of over-penetration or splitting.
Avoiding Common Mistakes in Nail Selection and Usage
Even experienced builders can make mistakes when choosing and using framing nails. Be aware of these common pitfalls to ensure your projects are successful:
1. Underestimating Nail Size
One of the most frequent mistakes is using nails that are too short for the job, such as using 6d nails for applications that require stronger holding power. Nails should be long enough to penetrate well into the receiving piece of lumber to create a strong connection. When in doubt, opt for a slightly longer nail size to ensure sufficient holding strength.
2. Overdriving Nails
While it’s important to drive nails flush with the wood surface, overdriving them can actually weaken the connection by crushing the wood fibers around the nail. Use a nail set to gently sink nail heads that protrude slightly, rather than forcing them in with additional hammer blows.
Read More About: Best Framing Hammer
3. Neglecting to Consider Corrosion
In outdoor or high-moisture environments, using standard nails can lead to rust and deterioration over time. Always choose hot-dipped galvanized, stainless steel, or other corrosion-resistant nails for framing projects exposed to the elements. The extra cost is well worth the long-term durability.
4. Ignoring Wood Species
Different wood species have varying densities and splitting tendencies, which affect nail selection. Hardwoods like oak require thicker nails and pre-drilling, while softer woods like pine may split more easily with large nails. Adjust your nail choice based on the specific wood you’re working with.
Frequently Asked Questions
What Gauge Nails Mean?
As with electrical wire, the gauge of a nail is equal to its diameter. The lower the gauge, the thicker the nail is.
What’s the Best Size Nail for Framing?
The best size nails for framing are 3-½ inches long, which are described as 16d nails.
What Types of Nails Are Used for Framing?
The most common types of nails used for framing are common nails, box nails, and sinker nails.
What Angle Nailer is best for Framing?
For framing jobs, a 21-degree angle nailer is better suited than a 30-degree angle nailer. The 21-degree angle offers easier access in tight spaces, while the 30-degree angle can be more challenging to maneuver. Read more about the pros and cons of 21 and 30 degree framing nailers.
Final Words
Understanding and selecting the appropriate nail sizes and gauges for framing is a critical skill that can make or break the success of your construction projects. By considering factors such as lumber dimensions, wood type, load-bearing requirements, and environmental conditions, you can choose the optimal nails to create strong, durable frames that will stand the test of time.
Remember to employ best practices like pre-drilling when necessary, adjusting nail gun settings, and using proper nailing techniques to further enhance the quality of your framing. Additionally, staying mindful of common mistakes, such as underestimating nail size or neglecting corrosion resistance, will help you avoid pitfalls and ensure your projects are built to last.
By following the guidance provided in this comprehensive article, you can approach your framing tasks with confidence, knowing that you have the knowledge and skills to select the right nails for the job. Whether you’re a professional contractor or a dedicated DIY enthusiast, investing in understanding nail sizes and gauges will pay dividends in the form of sturdy, reliable structures that showcase your craftsmanship and attention to detail.


